


|
How
to repair Chips - Bull's Eyes - Stars

Step 1
Clean off any dust and dirt with the razor blade included.
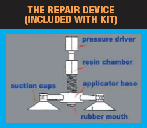
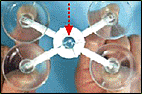
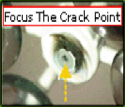
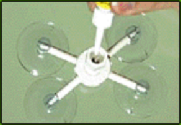
Set up the applicator base so that the damaged area is located in the centre of the hole. Make sure the
4 suction caps are firmly attached to the windscreen.
 . .
Step
2
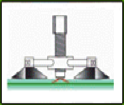
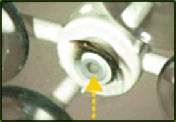
Screw the resin chamber into the centre hole of the
applicator base. Adjust the chamber to ensure that the rubber mouth makes contact with the breaking point, with
slight pressure, to ensure resin will not leak out.
ATTENTION: Too much pressure will compact the air
void in the chip and make it harder to inject the repair
resin into the chip or crack point.
 . .
Step
3
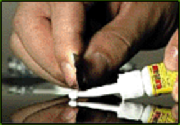
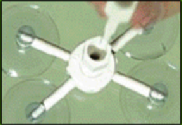
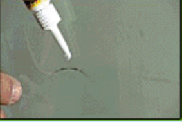
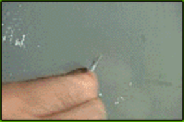
Cut off the tip of the repair resin bottle with the razor blade. Add 5 ~ 6 drops of repair resin into the resin chamber.
Caution: Be careful not to get any repair resin on vehicles paint work as staining may
occur.
 . .
Step
4
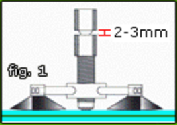
Screw the pressure driver so that it is nearly completely inserted as shown in fig. 1. Confirm that the rubber mouth has completely opened and check that the repair resin has penetrated into the breaking point adequately. The resin may take up to 5 ~ 10 minutes to fully penetrate.
ATTENTION: If the rubber mouth hasn’t opened, you will need to remove pressure driver and add 3 ~4 more drops of repair resin. Reinsert pressure driver and repeat step
4
 . . . .
Step
5
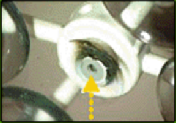
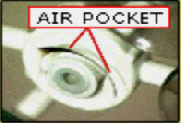
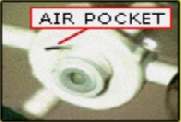
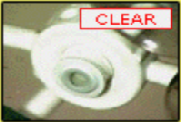
Remove the pressure driver from the chamber to exhaust the air from inside the damaged
area. Wait for 1 minute. Repeat the process of completely inserting and removing pressure driver until the repaired area becomes completely clear (transparent). Remove repair
device.
 . .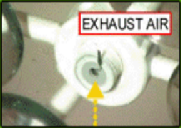
ATTENTION: The air in the glass will appear dark in colour. If there is any air remaining in the damaged area, after the repair device has been removed, repeat procedure from Step 1 to Step 5 again until clear.
 . . . .
Step
6
Add a few drops of repair resin directly to the impact point and quickly cover with curing strip. Then expose to direct sunlight or use a UV light (not included) for 5 minutes to ensure resin becomes hard.
Step
7
Remove curing
strip. Hold razor blads vertical (90degree) to the
windscreen. Scrape away hardened excess resin from
windscreen. The repair is now complete.
TIPS FOR REPAIRING IMPACT POINT
If the impact point is still noticeable -
TIP 1 : Add a very small amount repair resin to impact point on the end of a toothpick and cover with curing strip. Be careful not to apply any pressure to curing strip. If the resin spreads and becomes to large, clean windscreen and repeat with less resin, when the desired amount of resin is covered expose the windscreen to direct sunlight or UV light again. Remove the curing strip but don’t scrape of the excess.
Or
TIP 2 : Add a few drops of repair resin directly to the impact point and quickly cover with the curing strip. Then expose to direct sunlight. When the resin starts to harden, but is still soft and tacky (after 1 ~ 2 minutes) scrape of excess holding razor on less of an angle and applying less pressure. This should remove repair resin without scratching the remaining top layer of resin causing it to turn a whitish colour. |
