


|
How
to repair Cracks

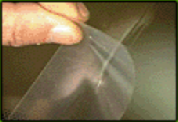
Step 1
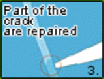
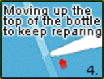
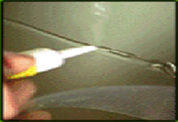
Start at
the bottom end of the crack working upwards, where
possible. Inject the repair resin directly into the
crack, slowly and smoothly using the tip of the resin
bottle. Let the repair liquid move through the crack
automatically in the glass (capillary action). View
crack at a 45degree angle to ensure the crack is beginning
to be repaired. If the crack is disappearing then continue
working up the crack until finished.
Important:
While the repair resin is still in liquid form,
the index of the refraction is different from
that when it cures and hardens. The crack will
still be visible at certain angles, so watch at
a 45degree to get best results.
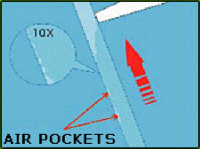
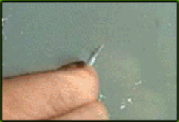
Attention: Be
careful to work very slowly when repairing
cracks. If any air pockets remain in the damaged
glass during the repair, the quality of repair
will be poor and still be visible upon completion. Never leave air in the crack, repeat step 1
until all air is expelled. This may take a few
attempts. |
 |
Step
2
Run more repair resin up the crack, covering the crack with curing strips as you go.
When applying curing strips, be careful not to apply any pressure to the glass, as this may allow
air back into the crack. Then expose to direct sunlight or use a UV light (not included) for 5 ~ 10 minutes to ensure resin becomes hard.
 . .
Step
3
Remove curing
strip. Hold razor blade vertical (90degree) to the
windscreen. Scrape away hardened excess resin from
windscreen. The repair is now complete.
TIPS FOR REPAIRING CRACKS
Some times you will find it difficult to inject repair resin into the crack directly. This is because the space between the crack in the glass is very tight, all that needs to be done is the space between the crack in the glass needs to be expanded. Don’t give up, here is a tip that should help.
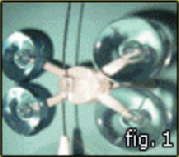
STEP 1: Using the repair device supplied in the kit, mount it on the inside of the glass (opposite side to the cracked glass) and locate the crack in the centre of the hole in the applicator base. (Fig 1)
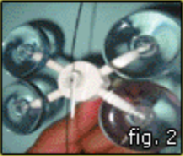
STEP 2: Screw the resin chamber into the applicator base, so that the rubber head make very gentle contact with the underside of the glass. Continue to screw the resin chamber very carefully (and very
slowly). This will cause the crack to open slightly. Repeat the repair process, if the repair is still difficult screw the resin chamber a little more until the repair becomes possible. (Fig 2)
CAUTION: Applying too much pressure to the underside of the crack will cause it to spread and become
unrepairable.
 .
.
|
